
Audience: Administrators
Overview
Ceridian Dayforce is a comprehensive, cloud-based HR management software. OrgChart can connect directly to Ceridian Dayforce.
The following article provides detailed information on:
- Frequently asked questions about OrgChart's integration with Dayforce
- Instructions on how to configure your Dayforce account to integrate with OrgChart
- Instructions on how to set up the Dayforce integration in OrgChart
- The fields OrgChart can pull from Dayforce
Dayforce integration FAQ
-
Can I pull photos from Dayforce into my org charts?
Not at this time. However, reference the article Photo Integration article to view a number of other methods available to pull photos into OrgChart.
-
Can I limit the fields that a user is able to pull from Dayforce?
Yes. Reference the Configuring your Dayforce account to integrate with OrgChart section below for more information.
-
What fields can I pull from Dayforce?
Reference the Dayforce field compatibility section of this article for a list of the fields that OrgChart can pull from Dayforce. If you want additional fields from Dayforce to be added to OrgChart, reach out to OrgChart Support and we can determine if we can add them.
-
Can I merge data from a secondary source with Dayforce data?
Yes. To learn how to aggregate data, please reference the Data Aggregation article.
-
Can I embed org charts (generated from Ceridian data) into my intranet?
Yes. To learn how to create links to your org charts, please reference the Web Link article.
-
Can I add open requisitions from Dayforce Recruiting into my org charts?
No. This option is not yet available via the Dayforce API.
You are welcome to run an Excel export of your recruitment data from Dayforce, and append it to your main data source. Reference the Flat File Prep and Data Aggregation articles for more information.
-
Can I filter which records are included in my org charts?
Yes. OrgChart administrators can create Import Filters to limit the records that are included in your charts.
Configuring your Dayforce account to integrate with OrgChart
Configuring your Dayforce account to integrate with OrgChart requires the completion of 4 main steps:
Creating an integration policy
- Log in to your Dayforce portal using your Company Name, Username, and Password.
-
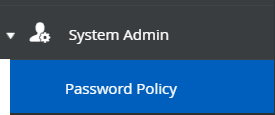
Click on the System Admin button (located in the left-side panel), and then click on Password Policy. Here, you will create an Integration Policy, which allows OrgChart to periodically pull your HR data.
- Select the '+' button at the top of the screen to create a new Integration Policy.
-
Name the policy "OfficeWork Integration Policy," and then create a Password Policy. To set a password policy:
a. Under the Password Lockout Rules heading:
- Enter 0 in the box under Lock Account for (Minutes)
- Enter 999 in the box under Failed Login Attempts before Lockout
b. Click on the Save button at the top of the screen.
Note
DO NOT enter a value under 'Default Password Life (Hours)." Passwords should not have an expiry.
Adding a service role
- Click on the System Admin button in the left side panel, and then click on Roles SL.
-
To add a Service Role:
- Click on the Add button at the top of the screen
- Enter the following Name: OfficeWork API Service Role
- Enter the following Description:OfficeWork API Service Role
- Select the Integration Policy from the dropdown menu
- Enter the following Reference Code: 512
-
Click on the Features tab, and then check the following checkboxes:

-
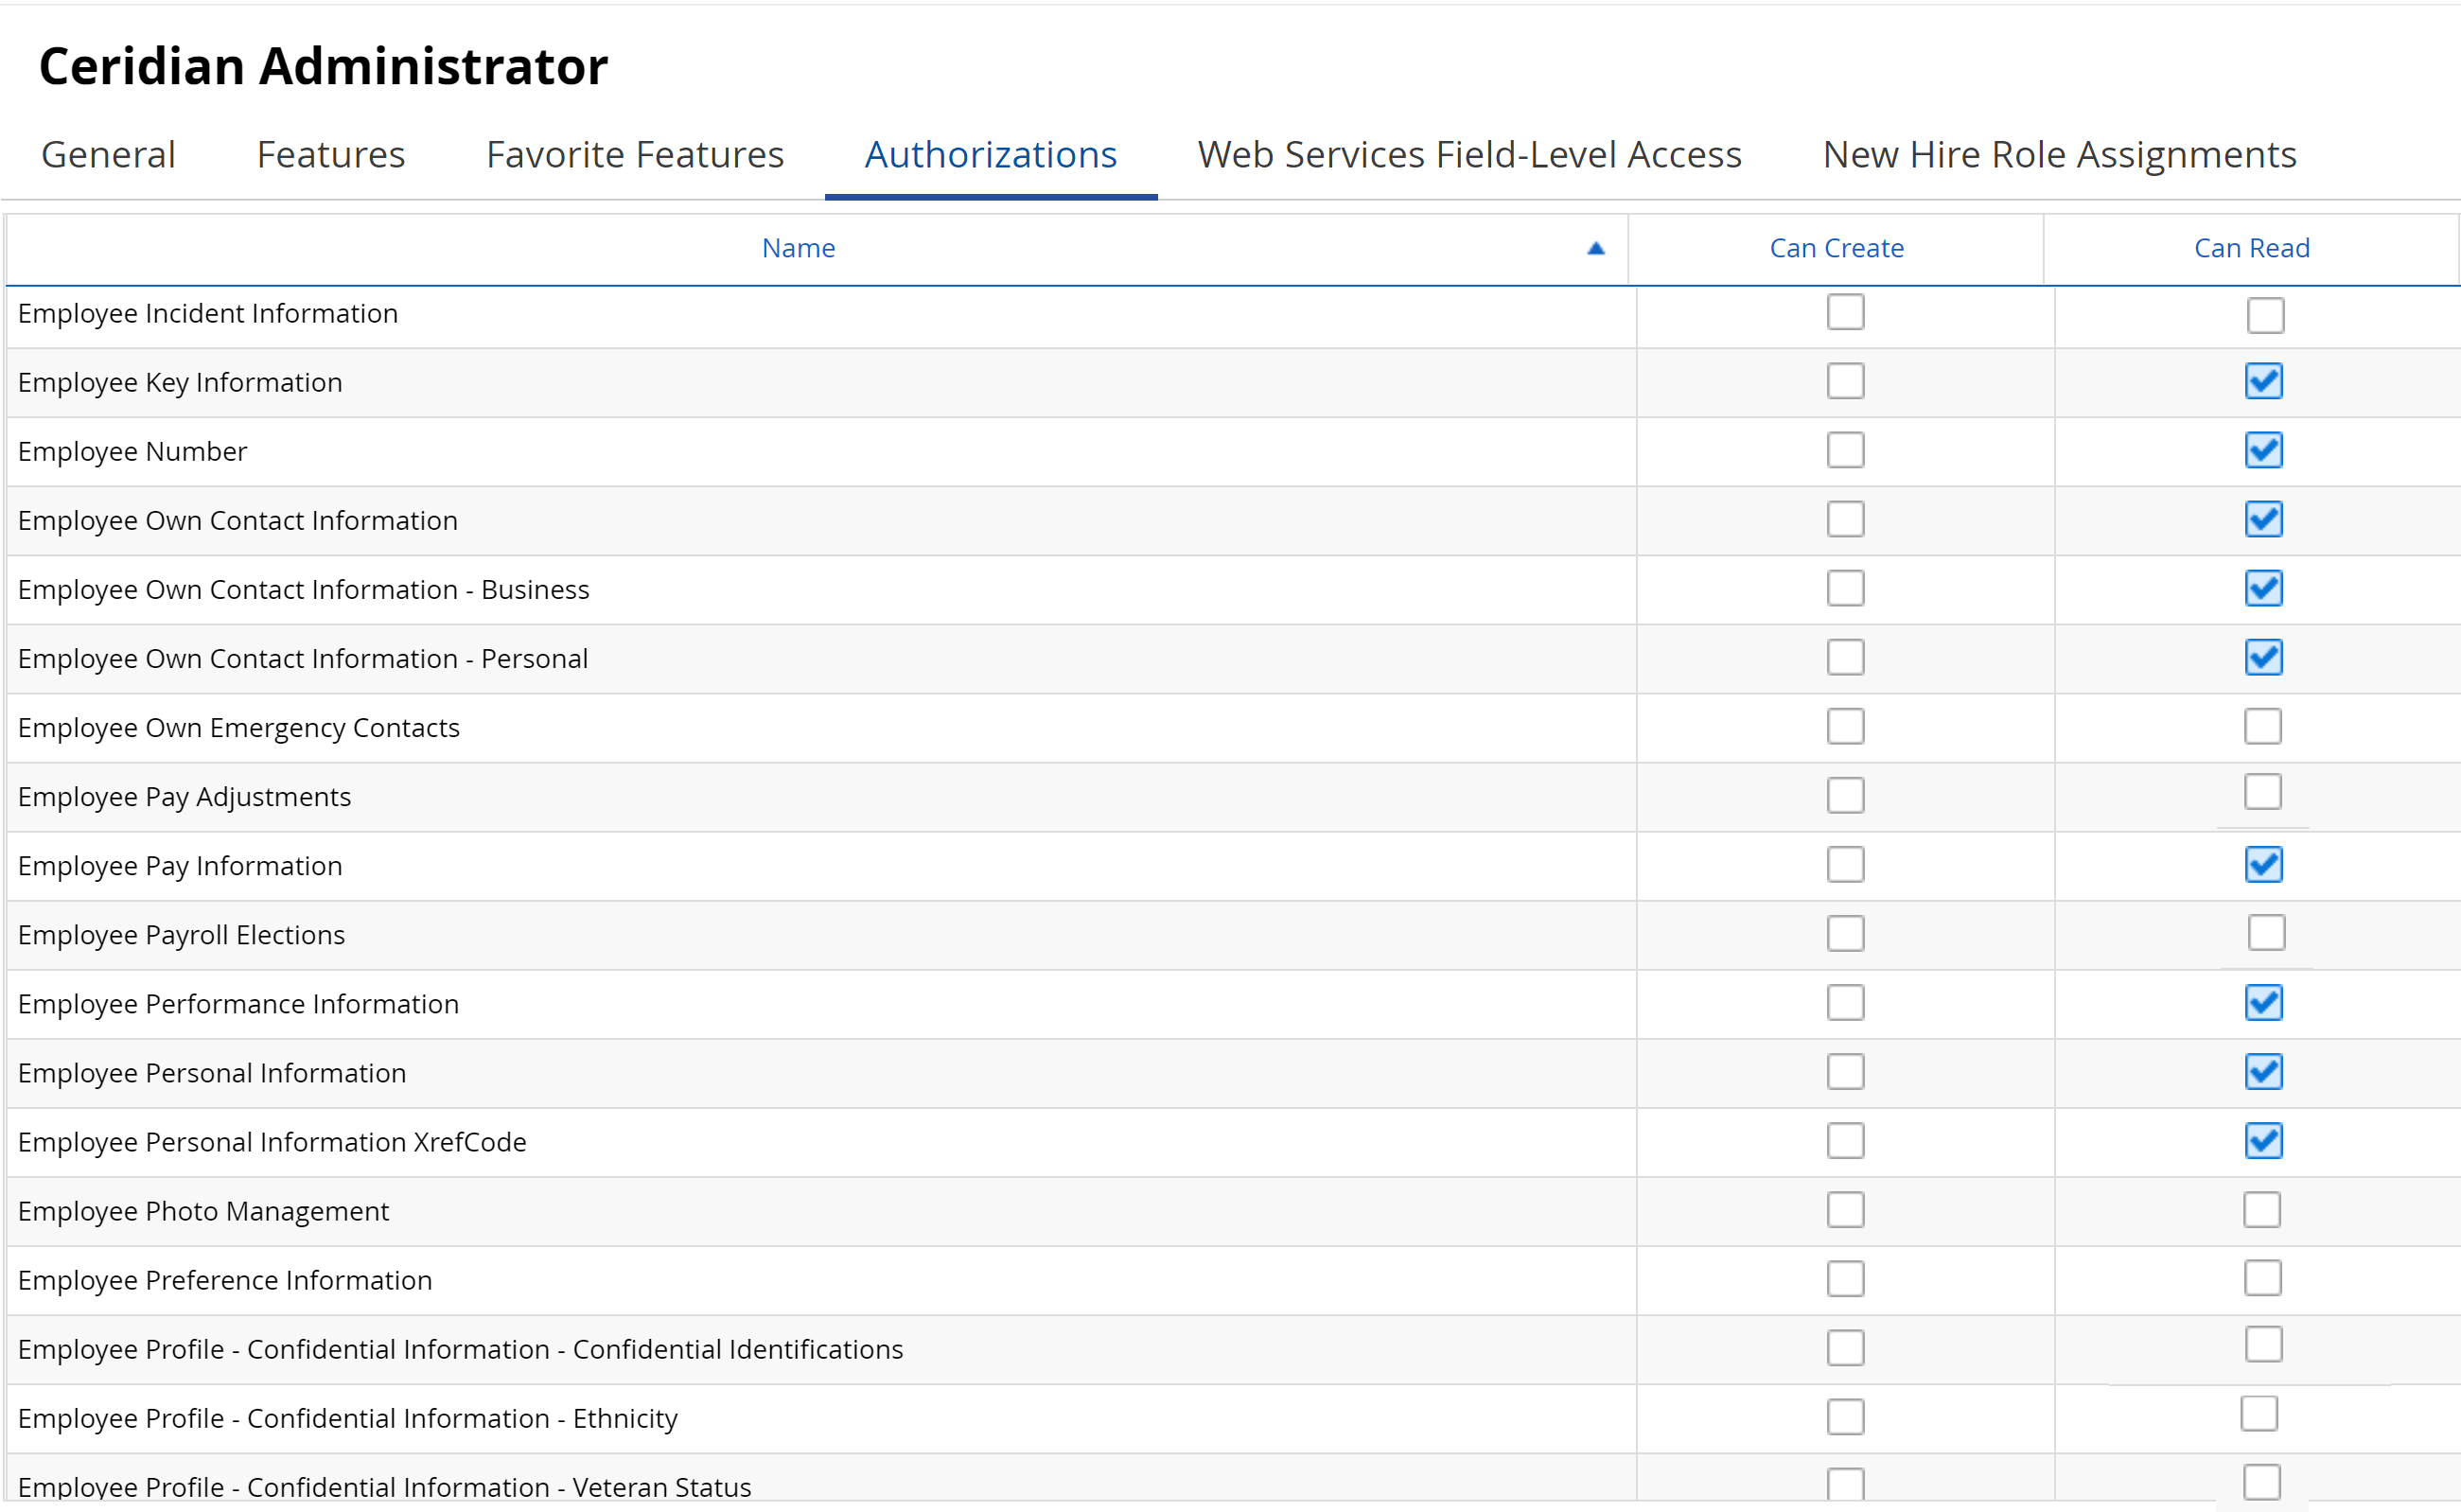
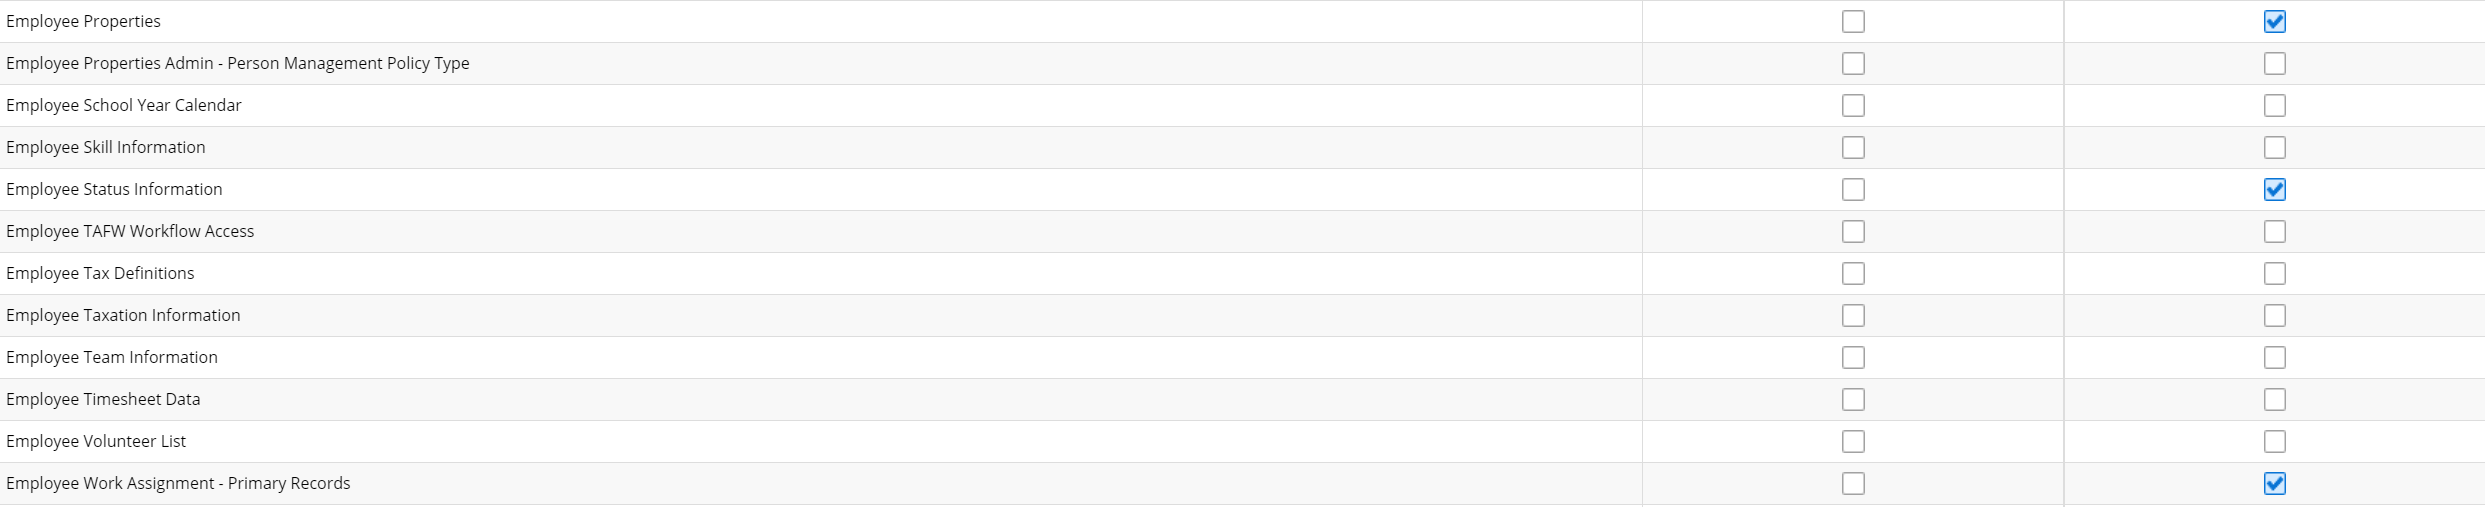
Click on the Authorizations tab, and then check the following checkboxes in the Can Read column:
Note
If you wish, you can omit some checkboxes if they do not comply with your company security policy. Typically, only non-PII fields are required by OrgChart.
- Then, scroll down, and check the following checkboxes in the Can Read column:
Note
The options above do not appear next to each other in the Authorizations list.
Selecting a data query
-
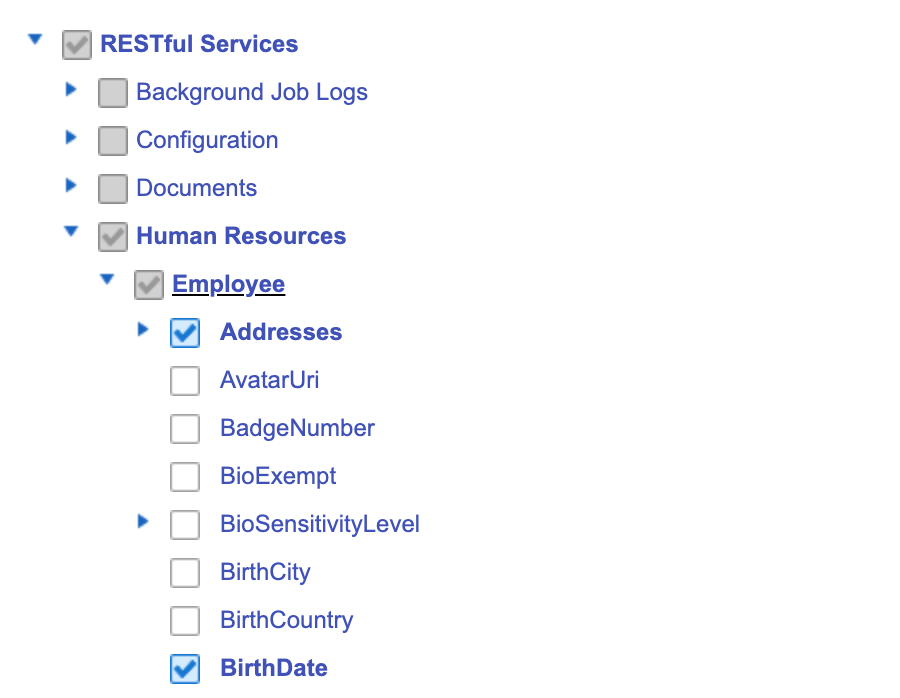
Click on the Web Services Field-Level Access tab, and then check the following checkboxes (shown in the screenshot below):
Caution
OrgChart can only pull fields under the Employee dropdown menu associated with the gray checkbox shown above. Do NOT check boxes under any other menu associated with a gray checkbox, as they will not be pulled into OrgChart.
-
Check at least the required fields. The following fields are required:
Menu Name Field WorkAssignments - Display Name
- XRefCode
- Position.LongName
EmployeeManagers - Manager XRefCode
- EmployeeNumber
Caution
XREFCODE maps to PersonID and ManagerXREFCode maps to SupervisorID in OrgChart. These fields essential to building the hierarchy of your organizational structure in OrgChart. To successfully pull data into OrgChart, these fields are required.
- Optionally, select more fields to pull into OrgChart. Fields that can be pulled are listed in the Dayforce field compatibility section below.
Adding a service user
-
Add the service user by selecting System Admin, and then selecting User. Select the
 button to add a new user.
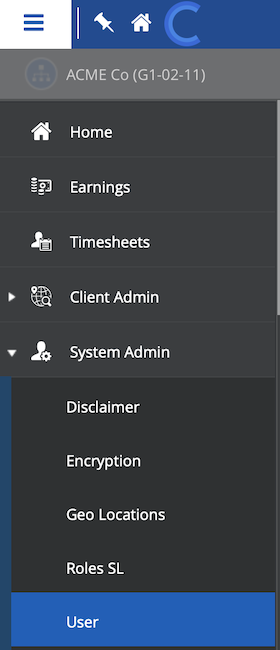
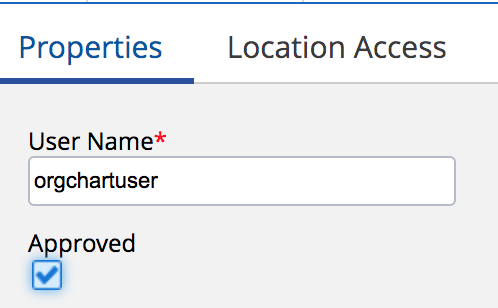
-
Enter in a unique username, culture, and password, as shown in the screenshot below.

Caution
You will need to enter this username and password into OrgChart.
-
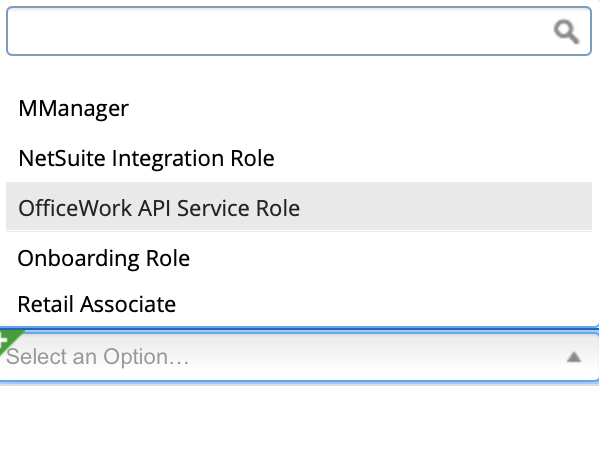
Click on the Add User Role button, and then double-click the box under the User Roles heading.
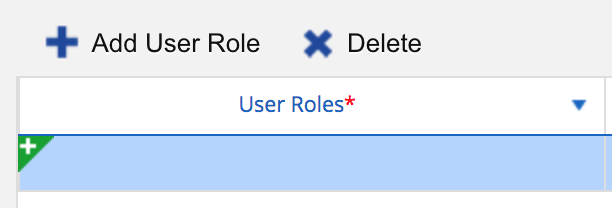
-
Select the Service Role (created in steps 1-4 of the Add a Service Role section) from the dropdown menu.
-
Check the Approved checkbox.
-
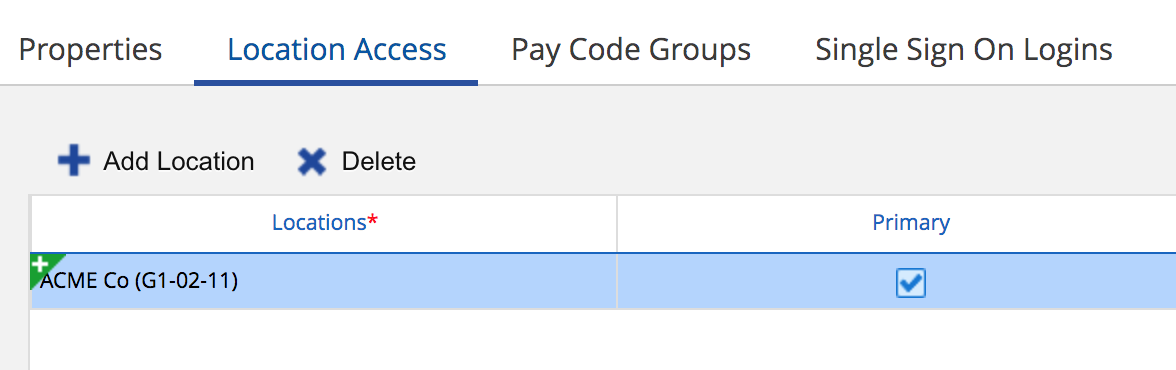
Click on the Location Access tab, then click on the Add Location button.
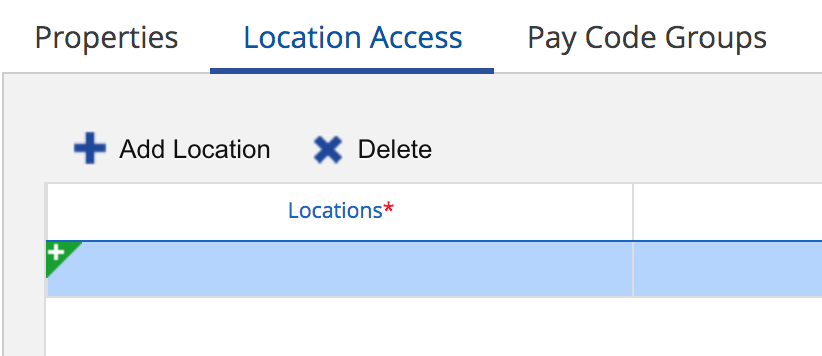
- Double click on the box under the Locations heading, and then select your entire company (or the part of your company used in OrgChart) from the dropdown menu.
-
Check the Primary check box (under the Primary heading).
- Click the Save button at the top of the screen.
Setting up your Dayforce integration in OrgChart
1. Click on the Settings button in the bottom right corner, and then select the Chart Settings option from the list.

2. Click on the 'Click here to select data source' hyperlink under the Main data source heading.

3. Select Dayforce from the list of main data sources.

4. Click on the Company ID text box, and then enter your Dayforce company ID.

5. Click on the Username text box, and then enter the username for the Dayforce service user created in the section above.

6. Click on the Password textbox, and then enter the password associated with the Dayforce service user created in the section above.

7. Click on the Additional fields dropdown, in order to pull in fields associated with any of the tables listed. OrgChart can pull fields from the following tables:
- Addresses
- Contacts
- EmployeeProperties
- EmploymentStatuses
- Ethnicities
- OrgUnitInfos
- PayGradeRates
- PerformanceRatings
- UnionMemberships
Note
If you plan to pull records with specific Dayforce statuses (i.e. a Dayforce status other than 'ACTIVE,' please enable the EmploymentStatuses additional fields table.

8. Optionally, enter the Reference Code associated with any Inactive statuses in Dayforce, in order to pull any records associated with that Inactive status into OrgChart.
Note
You can leave this text box blank if you do not intend to pull any records with an Inactive status.
If you have multiple Inactive statues, please write each Inactive status' Reference Code in the text box separated by a comma. Do not use spaces.

9. Optionally, enter the Reference Code associated with any Active statuses in Dayforce, in order to pull any records associated with that Active status into OrgChart.
Note
You can leave this text box blank if you are only trying to pull in records that are associated with the Active status 'ACTIVE.'
If you have multiple Active statues, please write each Active status' Reference Code in the text box separated by a comma. Do not use spaces.

10. Click on the Validate button to ensure that your credentials are valid.
Note
If authorization fails, a failed authorization alert is displayed, which details the invalid credentials. Re-enter valid credential, and then re-test until you receive a successful authorization.

11. Click on the Save button to preserve your changes.
12. Click on the Save button in the Chart Settings: Data sources panel, and then click on Refresh.
Note
The refresh may take a long time, depending on how many records you are pulling and how many additional field tables that you've enabled. If you are unable to successfully refresh manually, please schedule a refresh.

Dayforce Hard Refresh
Due to the nature of how OrgChart pulls data from Dayforce, you may need to perform what is called a 'hard refresh.' A hard refresh is necessary when you change or update employee statuses, or when you want to pull new fields from the API after your initial setup.
Admins can perform a hard refresh by following these steps:
1. Open the Dayforce configuration modal in the Chart Settings: Data sources panel, and then clicking on the Reset Integration option. An alert spawns to confirm the action.
2. Click on the Reset Integration option.
3. You have established a new data baseline. Your chart will show that it has not been refreshed.
Note
You may attempt a manual data refresh, though refresh times can be long. OrgChart suggests that you wait until next automatic refresh to see the data update.
Dayforce field compatibility
The following table displays how each Dayforce element maps to OrgChart. Check the following Dayforce checkboxes (under the appropriate Dayforce menu) to pull into OrgChart. The bolded elements are required, while the rest are additional, optional fields.
| Dayforce Menu | Dayforce Element | OrgChart Equivalent |
| Employee > Addresses > Address1 | Addresses.Address1 | Address1 |
| Employee > EmployementStatuses > Base Salary | BaseSalary | Base Salary |
| Employee > Contacts > ElectronicAddress | ElectronicAddress | Business Email |
| Employee > Contacts > ContactNumber | ContactNumber | Business Mobile |
| Employee > Addresses > City | Addresses.City | City |
| Employee> WorkAssignments > Location > LegalEntity | LegalEntityAddress.City | City |
| Employee > Contacts | CommonName | Common Name |
| Employee > WorkAssignments > Location > LegalEntity | Location.LegalEntity.LongName | Company |
| Employee > PayGradeRates > ControlRate | ControlRate | Control Rate |
| Employee > PayGradeRates > ControlSalary | ControlSalary | Control Salary |
| Employee > Addresses > Country |
Addresses.Country.Name Adddresses.Country.XRefCode |
Country |
| Employee> WorkAssignments > Location > LegalEntity> LegalEntityAddress> Country | LegalEntityAddress.Country.Name | Country |
| Employee> WorkAssignments > Location > LegalEntity> LegalEntityAddress> Country | LegalEntityAddress.Country.XRefCode | Country Code |
| Employee > WorkAssignments > Location > LegalEntity | Location.LegalEntity.ShortName | Division |
| Employee | EmployeeNumber | Employee Number |
| Employee > Employee Properties |
EmployeeProperty.LongName EmployeeProperty.XRefCode EmployeeProperty.StringValue |
Employee Property 1 |
| Employee > Employee Properties |
EmployeeProperty.ShortName EmployeeProperty.XRefCode EmployeeProperty.StringValue |
Employee Property 2 |
| Employee > Ethnicities | Ethnicity.LongName | Ethnicity |
| Employee > Ethnicities | Ethnicity.ShortName | Ethnicity Code |
| Employee | FirstName | First Name |
| Employee > Gender | Gender | Gender |
| Employee > WorkAssignments > Position | Position.Job.LongName | Job Description |
| Employee > WorkAssignments > Position > Job |
JobFamily.LongName JobFamily.ShortName JobFamily.xRefCode |
Job Family |
| Employee > WorkAssignments > Position | Position.Job.UDFString1 | Job Field 1 |
| Employee > WorkAssignments > Position | Position.Job.UDFString2 | Job Field 2 |
| Employee > WorkAssignments > Position | Position.Job.UDFString3 | Job Field 3 |
| Employee > WorkAssignments > Position | Position.Job.ShortName | Job Title |
| Employee | LastName | Last Name |
| Employee > Culture | Culture.LongName | Locale |
| Employee > WorkAssignments > Location | Location.LongName | LocationLongName |
| Employee > WorkAssignments > Location | Location.ShortName | LocationShortName |
| Employee > PayGradeRates > MaximumRate | MaximumRate | Maximum Rate |
| Employee > PayGradeRates > MaximumSalary | MaximumSalary | Maximum Salary |
| Employee > PayGradeRates > MinimumRate | MinimumRate | Minimum Rate |
| Employee > PayGradeRates > MinimumSalary | MinimumSalary | Minimum Salary |
| Employee | Display Name | Name |
| Employee EmploymentStatuses | NormalWeeklyHours | Normal weekly hours |
| Employee > OrgUnitInfos > OrgUnitDetail > OrgLevel | OrgLevel.LongName | Organization level |
| Employee > OrgUnitInfos > OrgUnitDetail > OrgLevel | OrgLevel.ShortName | Organization Name |
| Employee > OriginalHireDate | OriginalHireDate | Original Hire Date |
| Employee > EmployementStatuses > PayClass | EmployementStatuses.PayClass.LongName | Pay Class |
| Employee > EmploymentStatuses > PayGroup > PayFrequency | PayGroup.PayFrequency.LongName | Pay Frequency |
| Employee > PayGradeRates > PayGrade | PayGrade.LongName | Pay Grade |
| Employee > EmployementStatuses > PayGroup | EmployementStatuses.PayGroup.LongName | Pay Group |
| Employee > EmployementStatuses > PayType | EmployementStatuses.PayType.LongName | Pay Type |
| PerformanceRatingScale.ShortName | PerformanceRating.ShortName | Performance Rating |
| Employee > PerformanceRatings > PeformanceRating | PerformanceRating.XRefCode | Performance Rating Code |
| Employee > PerformanceRatings > PerformanceRatingScale | PerformanceRatingScale.LongName | Performance Rating Scale |
| Employee > PerformanceRatings > PerformanceRatingScale | PerformanceRatingScale.ShortName | Performance Rating Scale Code |
| Employee | EmployeeXRefCode | Person ID |
| Employee > Addresses > PostalCode | Addresses.PostalCode | Postal Code |
| Employee > WorkAssignments > Location > LegalEntity > LegalEntityAddress | LegalEntityAddress.PostalCode | Postal Code |
| Employee > PayGradeRates > RateMidPoint | RateMidPoint | Rate Mid Point |
| Employee > PerforamanceRatings | RatingScore | Rating Score |
| Employee > PerformanceRatings | ReviewDate | Review Date |
| Employee > PerforamanceRatings > Reviewer | Reviewer.XRefCode | Reviewer Code |
| Employee > WorkAssignments | WorkAssignment.EffectiveStart | Start Date |
| Employee > Addresses> State |
Addresses.State.Name Addresses.State.XRefCode |
State |
| Employee > WorkAssignments > Location > LegalEntity > LegalEntityAddress > State | LegalEntityAddress.State.Name | State |
| Employee > WorkAssignments > Location > LegalEntity > LegalEntityAddress > State | LegalEntityAddress.State.XRefCode | State Code |
| Employee > EmployementStatuses > EmploymentStatus | EmployementStatus.LongName | Status |
| Employee > WorkAssignments > Location > LegalEntity > LegalEntityAddress | LegalEntityAddress.Address1 | Street |
| Employee >EmployeeManagers | ManagerXRefCode | Supervisor ID |
| Employee >WorkAssignments | Position.LongName | Title |
| Employee > UnionMembersShips> Union |
Union.XRefCode Union.ShortName Union.LongName |
Union |
| Employee > UnionMembersShips> EffectiveStart | UnionMemberships.EffectiveStart | Union Effective Start |
| Employee> UnionMemberships> UnionMembershipDate | UnionMemberships.UnionMembershipDate | Union Membership Date |
| Employee > WorkAssignments > WorkLocationOverride | WorkLocationOverride.ShortName | Work Location Override |
Note
Some fields require multiple Dayforce Elements are checked in order to pull correctly in OrgChart.
Important
It is important to check the child boxes within parent boxes, otherwise data might not be selected that you had meant to select. For instance, check the values within the workAssignments table for the Job, Department, and Location tables. Ensure access is given to ShortName, LongName, if possible.
Comments
0 comments
Please sign in to leave a comment.