
Audience: Administrators
Overview
UKG Ready is a powerful HR, talent, and payroll management tool. OrgChart can pull employee data directly from UKG Ready using a REST API.
The following article provides detailed information on:
- Frequently asked questions pertaining UKG Ready's compatibility with OrgChart
- Instructions on how to configure your UKG Ready account to integrate with OrgChart
- Instructions on how to set up the UKG Ready Integration in OrgChart
The following is a list of frequently asked questions pertaining to UKG Ready's compatibility with OrgChart.
FAQ
-
Q: How do I set up my connection to UKG Ready?
A: To set up your connection to UKG Ready, read the sections below that detail how to prepare your UKG Ready account and how to set up the integration in OrgChart.
-
Q: Can I pull photos from UKG Ready into my org charts?
A: Yes.
-
Q: Can I limit the fields that an OrgChart administrator is able to pull from UKG Ready?
A: Yes. Reference the Limit Fields Import Filter article for more information.
-
Q: What fields can I pull from UKG Ready?
A: Any field associated with the following Employee Profile tables:
- Account Information
- Cost Centers
- Personal Information
- Account Demographics
- Pay Information
- Pay Grades
- Dates
- Extra Fields
- Base Compensation
- Total Compensation
-
Q: Can I merge data from a secondary source with UKG Ready data?
A: Yes.
-
Q: Can I embed org charts (generated from UKG Ready data) into my intranet?
A: Yes.
-
Q: Can I add open requisition from UKG Ready into my org charts?
A: Not at this time.
You are welcome to run an Excel export of your recruitment data from UKG Ready, and append it to your main data source. Reference the Flat File Prep article and Append Data Connector articles for more information.
-
Q: Can I filter which records are included in my org charts?
A: Yes. Reference the Import Filters article for more information.
Configuring your UKG Ready account to integrate with OrgChart
- Log in to UKG Ready. Ensure that you have Company Administrator permissions.
- Click on the
 icon in the top left corner.
-
Click on the Team tab, and then following this click path: My Team > Employee Information.
- Click on the blue HIRE button (in the top right).
- Enter a Password in the New Password text box.
-
Enter values for all required fields on each page of the New Employee workflow, and click on Continue.
- On the Other Settings page of the New Employee workflow, locate the Security Profile object.
-
Click on the
 icon, and then select a Security Profile to apply to the API Service User.
Note
If you choose to not create a custom Security Profile for the API Service User, select the Company Administrator option from the Security Profile list. Optionally, reference the Creating a Custom Security Profile section below to learn how to create a Security Profile specifically for your API Service User.
- Click on Apply, and then click on Continue.
- Click on Add Employee, and then click on Add when the confirmation dialog is displayed. The Employee Profile for the API Service User is displayed.
- Click on Save (in the top right).
- Click on the icon in the top left corner.
-
Click on the Settings tab, and then follow the click path: Global Setup > Groups > Employee Groups Configuration
-
Find the System Group named All Company Employees, and then click on the edit icon.
-
Click on the VIEW GROUP PERMISSIONS button (in the top right), and then click on the Add Manager button.
-
Search for the API Service User (created in Step 1), and then check the boxes according to the screenshot below:
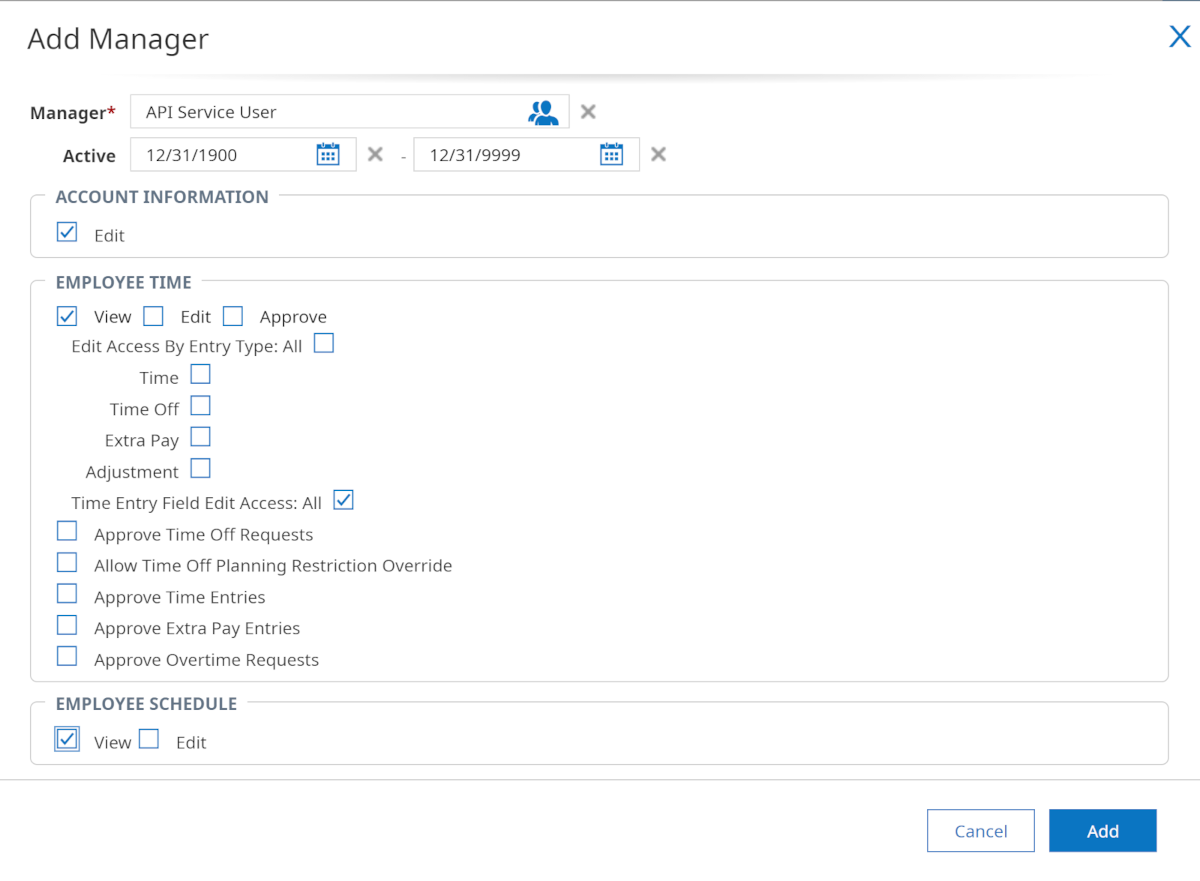
- Optionally, scroll down and check the View checkbox under the Employee Base Compensation heading to import salary information to OrgChart.
- Click on Add.
- Click on the icon (in the top left corner), and then click on the Settings tab.
-
Follow this click path: Global Setup > Company Setup, and then click on the Login Config option (as shown below).
-
Scroll to the bottom of the Login Config page, and then click on the Generate button in the API Keys section.
- Click on Yes to generate a new REST API Key.
- Click on the eye icon (to the right of the Rest API Key) to reveal the value. Copy and Paste this value to your Notepad.
- Sign in to UKG Ready as the API Service User.
- Change the password, and then copy the new password to your Notepad, as you will need it when setting up the connector in OrgChart.
Creating a Custom Security Profile
If desired, you can create a Security Profile specifically for the API Service User.
A custom security profile allows you to curate the tables that the API Service User is able to pull from an employee's profile into OrgChart.
At this time, OrgChart can pull employee data from the following tables:
| Table | Pull Type |
| Account Information | Default |
| Cost Centers | Default |
| Personal Information | Default |
| Payment Information | Default |
| Base Compensation | Additional |
| Total Compensation | Additional |
| Account Demographics | Detailed |
| Badges | Detailed |
Note
Tables marked with Additional pull type will only be imported into OrgChart if they are toggled in the Additional Tables dropdown menu.
Tables marked with a Detailed pull type will only be imported into OrgChart if Detailed Data Pull is enabled.
Reference the "Setting up your UKG Ready integration in OrgChart" section below for more information.
The following section provides step-by-step instructions for creating a custom Security Profile for an API Service User.
- Log in to UKG Ready. Ensure that you have Company Administrator permissions.
- Click on the icon in the top left corner.
-
Click on the Settings tab, and then follow the click path: Profiles/Policies > Security
- Click on New Security Profile.
- Enter a name for the Security Profile in the Name text box.
- Optionally, enter a description for the Security Profile in the Description text box.
- Check the View checkbox, or select View from the Permissions dropdown menu for each field on each UKG Ready Tab.
-
Ensure the following permissions are enabled for the required objects:
Note
If any of the following required objects are not available to you, please contact your UKG representative. They may need to enable additional fields in your instance.
Organization (Cost Center) Field MappingEnter Cost Center into the Search box, and then click on each specified tab to set the following permissions:
Tab Section Field Permission Global Company Setup Cost Center Configuration View Global Global Setup Cost Center Definitions View Global Global Setup Cost Center Trees View Global Object Lists Cost Centers View HR Employee Cost Centers View HR Employee Employee Managed Cost Centers View HR Employee Employee Scheduled Cost Centers View HR Employee Managed Scheduled Cost Centers View ESS Employee Cost centers View ESS Employee Scheduled Cost Centers View
Job Field MappingEnter Job into the Search box, and then click on each specified tab to set the following permissions:
Tab Section Field Permission Global Global Setup Jobs View Global Object Lists Jobs View HR Employee Jobs View
User Field MappingEnter Employee into the Search box, and then click on each specified tab to set the following permissions:
Tab Section Field Permission Global Groups Employee Groups View HR Employee Positions View (w/ Amounts) HR Employee Employee Assignments View (w/ Amounts) HR Employee Position Hierarchy Chart All Company Positions HR Employee Employee Information (My Team) View HR Employee Account/Personal Information View HR Employee Managers View Modules Rest API Resources Employee Pay Information View Modules Rest API Resources Employee Profiles View Modules Rest API Resources Employees View ESS Employee Account/Personal Information View ESS Employee Managers View
Setting up your UKG Ready integration in OrgChart1. Click on the Settings button in the bottom right corner, and then select the Chart Settings option from the list.

2. Click on the 'Click here to select data source' hyperlink under the Main data source heading.

3. Select UKG ready from the list of main data sources.

4. Enter the following information into the corresponding text boxes:
- Subdomain: First section of your UKG Ready login URL (i.e. secure6)
- Company:Company Name used to log in to UKG Ready
Note
You can find your Company Name in your login URL.
-
Username: Username of the API Service User
-
Password: Password for the API Service User
-
Client Key: API Key generated in the UKG Ready Company Admin panel
-
Additional fields: Click to toggle the Base Compensation or Total Compensation tables on or off. Reference the Additional tables section below for more information.
-
Detailed data query checkbox: Check to pull employee data associated with the Account Demographics, Pay Information or Badges tables.
-
Specify endpoint checkbox: Check to enable the specify endpoint text box. Enter an endpoint if your UKG Ready endpoint is different from the default (saashr.com).
5. Click on Save, and then close the configuration panel.
6. Click on Save and then Refresh.
Important
Manual refresh is disabled when Detailed Data Pull is turned ON. If you've enabled the Detailed Data Pull, click on Save, and wait for the next Automatic Data Refresh.
Additional tables
Optionally, you can choose to pull employee data from the Base Compensation or Total Compensation tables.

The following employee data exists in these tables:
Base Compensation
- Annual Amount
- Annual Hours
- Pay Period Amount
- Pay Period Hours
- Hourly
- Effective From
- Pay Periods (PP)
- % Change
- Time Period
Total Compensation
- Annual Amount
- Currency
- Annual Hours
- Pay Period Amount
- Pay Period Hours
- Hourly Amount
- Effective From
Comments
0 comments
Please sign in to leave a comment.